Make Your Own Spanish Guitar - online book
Complete plans & Instruction on how make your own Spanish Guitar.
| Share page | Visit Us On FB |
|
25 |
|||
|
|
|||
|
THE FINGERBOARD
After the face of the neck has been planed perfectly level, the next step is to prepare the fingerboard which will later be glued on to the neck. This is best made of ebony� but the amateur guitar maker may have to compromise with a hard rosewood or walnut �or, as is used on some of the cheaper imported guitars, black-stained pearwood.
The finished fingerboard will be 171/2" long by 1/4" thick; 21/8" wide at one end and about 21/2" wide at the other. Care should be taken in preparing both sides of the ebony (taking great pains to see that the fingerboard is perfectly straight throughout its entire length) and, when this is done, mark a centre pencil line down the better side.
Now we come to the marking of the fret positions�and a lot depends upon this operation, for if it is not done correctly the finished guitar will not play in tune.
Great care must be taken over this work.
It would be wise to first mark the fret positions on a narrow strip of zinc or aluminium and, when this is completed, the markings can be transferred to the centre pencil line on the fingerboard with a fine-pointed scribing tool.
THE FRETS
There are several methods of deciding the positions for the frets but the simplest, for the amateur guitar maker is what is known as the 17.835 rule.
In this, one takes the instrument's scale length (in our case, 255/8"�the distance from nut to bridge) and, having marked this dis�tance on our strip of zinc or aluminium it is divided by 17.835, which gives the posi�tion of the first fret�the fret nearest to the nut. Then the distance from the first fret to the bridge is again divided by 17.835 �and this gives the position of the second fret. Then the distance from the second fret to the bridge is again divided by 17.835� and this gives the position of the third fret; and so on until all the fret positions are marked.
As a check, the twelfth fret should be exactly halfway between nut and bridge, and the seventh fret two-thirds of the distance from nut to 12th fret. |
When measuring scale length we take, the distance from the inner edge of the nut (i.e. the side of the nut nearer the fingerboard) to the inner edge of the bridge saddle (i.e. the edge nearer the soundhole).
Having transferred our markings cor�rectly to the centre line on the fingerboard, we can now return to the neck of the guitar.
Marking the inner edge of the nut in its correct position on the neck, we use the zinc markings of the fret positions to find where the twelfth fret will be. (This should be 12 13/16" (i.e. half of our scale length of 255/8".) This is the point where the neck will join the body of the guitar.
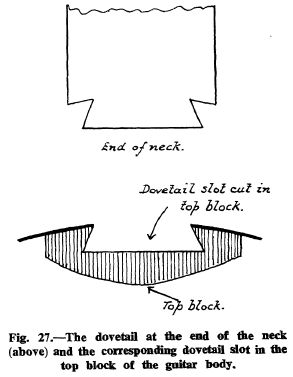
Prepare a dovetail at the end of the neck, tapering to the base (see Fig. 27) and cut the corresponding tapered slot in the top block of the body. This dovetail joint should allow the neck to fall slightly (i.e. the neck at the nut should be shghtly (about 1/8") below the level of the guitar face) and constant checking should be done with a straightedge to ensure that this " set" of the arm is correct.
The " set" of the neck can be checked as follows: |
||
 |
|||
|
|
|||